Accessing and Updating Your Concur Profile
Overview
This training guide walks you through accessing and updating your Concur Travel Profile. Before you use the Concur Travel booking tool for the first time, you MUST update your Travel Profile. The required fields will be notated in red in Concur.
KU employees can access Concur through their KU Single Sign On (SSO) by typing concur.ku.edu into the address bar of your internet browser window.
Step One:
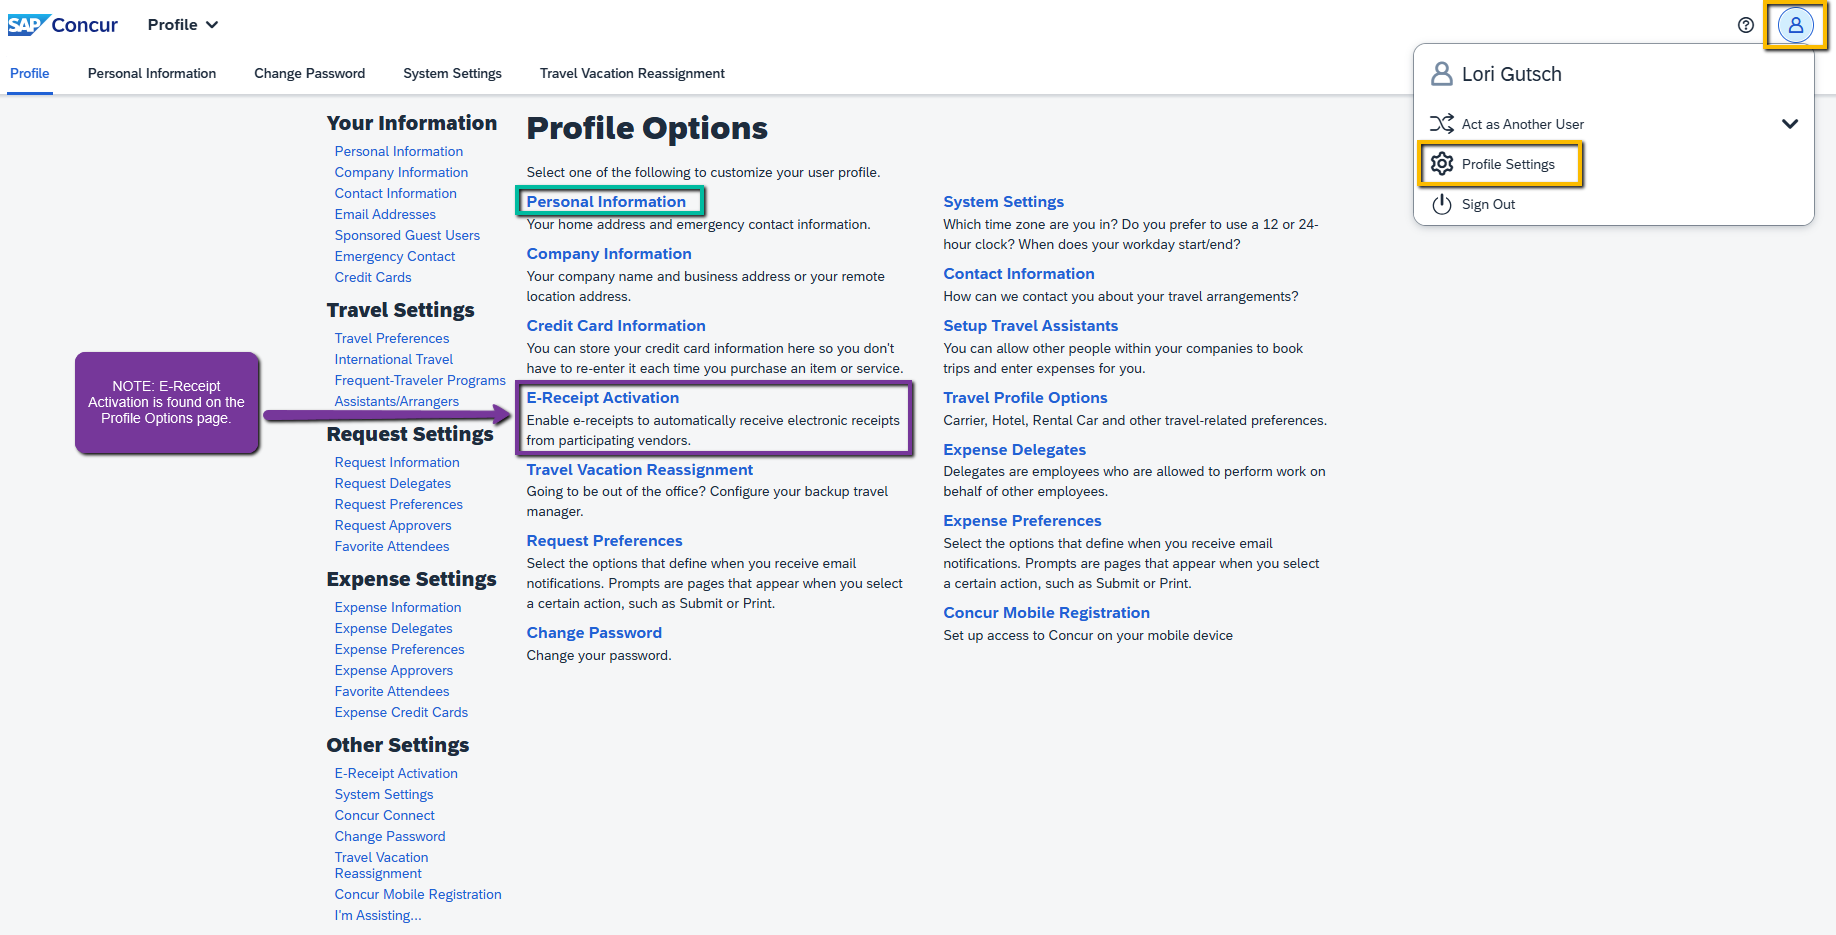
Open the Profile Options page.
- From the Concur Home Page select Profile > Profile Settings.
- The Profile Options page appears.
- You can update specific sections of your profile from the individual links provided under the Profile Options heading or use the menus on the left to select a section to update.
- To review/update your entire Profile select Personal Information.
The remaining STEPS walk through each section within the Profile.
Step Two:
The first section of the Profile contains a Jump To: dropdown for quick access to the various sections within the profile and your NAME.

- Add your Title.
- Verify that the first, middle and last names shown are identical to those on the photo identification that you will be presenting at the airport.
- If you have no middle name, check the “no middle name" box.
- If a correction needs to be made please contact KU Financial Management Systems (FMS) via email at fsku@ku.edu with the requested update. NOTE: if your name is different and you must update it, PLEASE check every time before you book airfare. Any changes in your HR Pay profile will cause the nightly feed from HR Pay to Concur to overlay your Concur profile with the data in HR Pay which includes your name as it is in HR Pay.
NOTE: In your Concur Profile, please avoid using any special characters such as #, / or - as they will likely cause a syncing error between our Concur and CTP's Sabre system where your travel is processed. If this occurs you'll get an error while trying to book in Concur and you will need to report it to concurhelpdesk@ku.edu for resolution assistance.
Step Three:
The Company Information section contains:
- Employee ID - already populated for you
- Manager - optional field
- Employee Position/Title - leave blank

Step Four:
The Work Address section contains:
- Company Name - already populated with University of Kansas
- Assigned Location - not required
- Address - optional, but you can complete

Step Five:
The Home Address section contains:
- Home Address - not required, but helpful information for CTP if you request assistance to have missing bags shipped to your home.

Step Six:
The Contact Information section contains:
- Phone Number -You are required to specify one phone number in either the Work or Home Phone field. The number you provide will be the number an airline will attempt to contact you at in the case of an emergency.
- It is highly recommended that travelers enter their mobile number in the Work Phone field, and do not use any dashes (-) while entering the numbers.
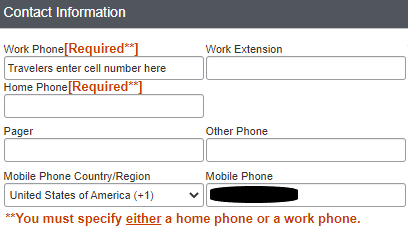
- Mobile Phone - Please enter your Mobile Phone Country/Region and Mobile Phone number without dashes (-), even if you entered it already in the Work Phone cell.
Step Seven:
The Email Addresses section contains:
- Email Addresses - Your KU Email address should already be populated in this area. You will need to Verify it. You can also + Add an Email address as needed.
- It is highly recommended that you add the email address of your SSC support staff or department travel processor so they can also get a copy of your travel itinerary/receipt emails from CTP.

1. By verifying your KU Email address, you are giving Concur the ability to associate information forwarded from that Email address, the Concur Mobile apps, or the apps of Concur partners (such as Uber, Parking Spot, etc.) to your Concur account.
- On your KU email address, select Verify.
- Check your email for a verification message from Concur.
- Copy the code from the Email and paste into the Enter Code field next to the email address back in the Concur profile - email addresses section.
- Select OK to submit the code and complete verification. Your email will now show as Verified in green.
Note: With your verified email you can also forward receipt emails to receipts@concur.com to have the receipt uploaded directly into your Available Receipts in Concur.
2. By adding the email address of your SSC support staff or department travel processor, you are better ensuring they will automatically get a copy of your travel itineraries for documentation purposes. 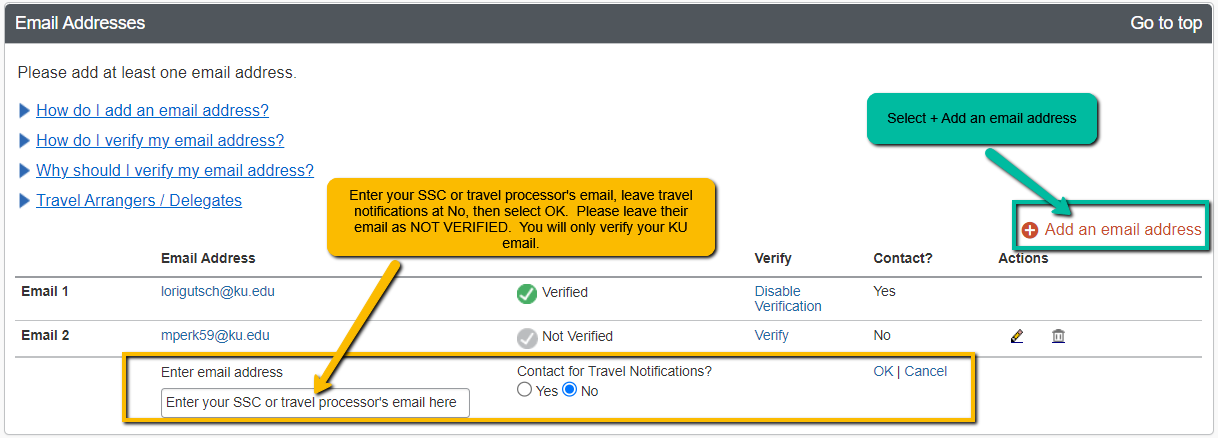
- Select the red + Add an email address link.
- Enter the email address of the SSC/travel processor where you normally email your invoices and receipts.
- Leave Contact for Travel Notifications as No.
- Please do not verify the SSC or travel processor's email that you added. They will verify their email on their own profile.
Step Eight:
The Emergency Contact section contains:
- Emergency Contact - The individual you list here will be contacted in the event of an emergency if you cannot be reached.

Step Nine:
The Travel Preferences section contains:
- Eligible Discount Rate/Fare Classes - By checking those that apply to you, the system will include the applicable discount rates/fare classes. You must have a card to present for proof of eligibility if requested by vendor.

- Air, Hotel, and Car Rental Preferences - The system will automatically apply saved preferences to your bookings and reservations.
- Note: Adding preferences will limit your search results accordingly when booking travel. For example, if you choose Aisle under Seat preference, your search results would not return any flights where an aisle seat is not available.

- Frequent Traveler Programs - One benefit with Concur is that you are still eligible to receive benefits and accrue your own rewards points on your accounts with various air, hotel, and car travel vendors’ rewards programs. Please ensure the name on your reward program matches your photo ID as well as the name saved in Concur.
- Select [+] Add a Program
- Select the vendor and enter your rewards number or ID.
- Can enter up to five travel vendors at a time
- Select Save.
- Repeat as needed.

- Unused Tickets Credits - Credits for canceled flights that were booked in Concur are automatically saved and appear here for easy tracking until applied to a future ticket purchase. While booking, just indicate that Yes, you have unused credits to apply and CTP will apply them to your ticket purchase.

- TSA Secure Flight – contains TSA required and PreCheck information. Make sure these items match your ID.
- Gender – prepopulated from HR
- Date of Birth – prepopulated from HR
- DHS Redress No – if applicable
- TSA Pre-Check, Known Traveler Number, or Global Entry Pass ID – if applicable

Note: Items like Date of Birth, TSA PreCheck, Passport/Visa and Credit Card numbers will be masked or partially masked for security purposes.
Step Ten:
The International Travel: Passports and Visa section contains:
- Passports and Visas - Securely store your passport and visa information. This will allow Concur to automatically include the information in your international reservations. Alerts will prompt you when your passport or visa is about to expire.
- Select [+] Add a Passport or [+] Add a Visa
- Enter the information.

If you book an international trip, you will receive an automated email from CTM, our travel agency CTP's parent company. It is an informational email to let you know if you met the passport and/or visa requirements for the trip location or not based on the information saved in your Concur profile. There is a link to CIBT visas to check the requirements for your international travel location.
Step Eleven:
The Assistants and Travel Arrangers section contains:
- Assistants and Travel Arrangers - In this section, you may select other Concur-profiled KU employees that you would like to give permission to perform travel functions for you such as booking travel, updating your travel profile, or view upcoming trips. You can have multiple Arrangers, but only 1 Primary Assistant.
- Note: If you check the “Refuse Self Assigning Assistants” box, a Concur administrator in the FMS will not be able to proxy into your account and assist you with travel issues. It is strongly recommended that you leave this box unchecked.

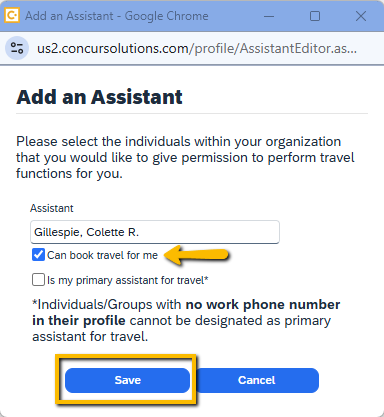
To Add an Assistant/Travel Arranger:
- Select [+] Add an Assistant
- Begin entering your SSC or assistant’s name in the Assistant field and select it from the list of choices that pops up.
- Check the box that applies
- Can book travel for me = someone that can book travel on your behalf and view your trip itineraries in Concur.
- Is my primary assistant for travel = same as Can book travel for me, but also receives itinerary email confirmations when the traveler books travel for themselves.
- Select Save
Step Twelve:
The Credit Cards section contains:
- Credit Cards - In this section you will add and securely store the card information used to purchase or reserve travel arrangements.

To add card:
- Select Add a Credit Card
- Fill out the required fields noted with a red asterisk (*).
- NOTE: For Single Trip Declining Balance P-cards, even though there is no name on the card, it has been assigned to you in the bank system. So you will enter your First and Last Name as the name on the card.
- Your P-Card is typically the default card for all categories
- Billing Address: For KU/KUCR P-Cards use the below addresses.
- When adding a UKANS P-Card the Billing address is:
- 1246 W Campus Rd, Lawrence, KS 66045
- When adding a KUCR P-Card the Billing address is:
- 2385 Irving Hill Rd, Lawrence, KS 66045
- When adding a UKANS P-Card the Billing address is:
- Select Save
- Notice all but the last 4 digits of the saved card number are masked for security purposes.
- You can Edit or Delete a credit card by selecting on the pencil or trashcan icon.

You can find the link for Online Account Access and other P-Card related info on the Payables: P-Cards webpage.
There are a few important items of note pertaining to credit cards in Concur:
- For security and appropriate institutional compliance, travelers are not permitted to save a credit card assigned to another employee or a department card to their Concur profile.
- SSC and Department P-cards may no longer be used for travel expenses, except for Guest Travel.
- With the implementation of Concur Travel, KU Employee Travelers need to use one of the following cards to book travel:
- A KU or KUCR Individual 'standard' or Travel P-Card issued in the traveler’s name
- A KU or KUCR Declining Balance 'single trip' P-Card issued to the traveler
- A personal credit card
- Although it is not prohibited, it is highly recommended not to use a personal card to pay for travel expenses. Out-of-pocket expenses must be entered manually to your expense reports, and reimbursement for these will be processed only after the conclusion of your trip. When you use a P-Card your expenses automatically feed into Concur and auto-matched with e-receipts, allowing your SSC or expense report processor to assign them to expense reports with ease.
- Employees can obtain a KU, KUCR or Single Trip Declining Balance P-Card by completing the following:
- Fill out and submit the P-Card application in TeamDynamix (TDX).
- Hint: Employees who travel more than once per year should get an Individual standard or Travel P-card rather than a Declining Balance P-card.
- Note: If applying for a Declining Balance P-Card a TR must be approved before applying.
- Complete and Pass the P-Card Quiz in Canvas. The requestor will be notified by email with the link to take the quiz.
- Your P-card will be mailed to you upon successfully completing the quiz. If needed you can contact the P-card administrators to schedule a card pick-up day/time.
- NOTE: The process to get a Travel/Individual P-card takes approximately 10 business days. Declining Balance P-cards are generally received in 4-5 business days.
- Fill out and submit the P-Card application in TeamDynamix (TDX).
Step Thirteen:
You should now be to the bottom of the My Profile—Personal Information page.
- Select the blue Save button at the bottom of the screen under the Credit Cards section.

- Make sure you see the Profile Saved message towards the upper right hand of your screen before moving on.

Note: There are multiple places to Save throughout your Profile page, this is to keep you from having to scroll through the entire page for those times when you are just updating one specific section.